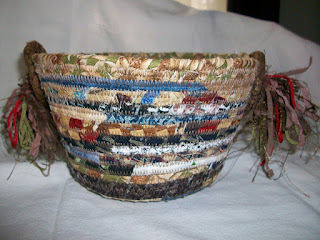
I have the sweetest sister, Annie. Once again, she gave me terrific birthday gifts. I know she gave a lot of thought and put her heart into what she made for me!
The miniature wall quilt is adorable. I asked her how she could work so small and she told me it gets easier after a few drinks! The colors are perfect for my home.....and she made a hanging pocket so it is ready to go! I LOVE IT!
Then the fabric bowl is awesome! She explained how she made the bowl but it does not seem possible. She wrapped a clothes line and sewed it together using a zig-zag stitch. Of course, she sews on a new Bernina.....that has to be the answer! Where does she get these great ideas?
Don't you love the colors!!
I absolutely am delighted with the handles! Way too cute ! ! !
And if she thought that was not enough.....she made this little wallet that is perfect for times that you need your I.D., credit card and a little cash instead of carrying the big purse. She must have had me in mind for all my flea market and antique shopping that I love to do! This is the front of the wallet.
Inside view....isn't the zipper fabric fabulous!
The back view.
Inside the wallet was a hand-painted pin! (painted by another artist) Wow....all the gifts sure makes it worth turning fifty-seven!
Thank you sweet Annie! You're the best!
Piano Hinge Book Swap
I knew my friend Judi would especially appreciate an Asian themed book! To my delightful surprise, she also made me one with the same theme.
The beads were a recent purchase from a shop in Dallas...I bought the entire string of beads just for this project. I love how they dangle from the chopstick spine!
The decorative background paper I used can be found at many stationery shops and art stores ...I think I purchased mine at Art Mart in St. Louis a couple of years ago. The image on the front I have had in my stash of collage materials for a very long time.
I needed to stabilize the inside cover as I made the piano hinge slots large in order to view the script on the chopsticks. So this was my solution...using a high fiber content paper with a hinge adhering to the first page. The cover no longer has any "play" and will stay in its proper place.
The pages were made using heavy card stock in a light gray shade. It was perfect for all the reds and blacks that I was going to use for this book!
Since the piano hinge book opens flat, it gives an artist an opportunity to make double page spreads which are my favorite. The Mah Jong tiles are used as the cohesive element.
I wish I could remember where I found the playing cards as I have now used the entire deck! Oh well....the hunt will be fun!
I like using newspapers as a background too. Since I do not know the Chinese language...it would be interesting to actually know what the text says.....hope it is not bad news!
I enjoy making tags that are part of a page. To me it adds a lot of interest. All the postage stamps used for this project came from my friend Minori who lives in Japan.
A dragon punch was used and then on the next page, Glimmer Mist was sprayed on the dragons that were punched separately. The fish and coin were from a scrapbooking convention.
Here are the last of my cards. I saved the queens and they were perfect for this page. They are inserted into the photo slots.
I really enjoy using my rubberstamps. On the left, I watercolored after embossing and on the right, I used chalks.
My daughter says to me...."you can never have too many choices"..... so I have two different stamps for the kimono robes.
The butterfly ribbon adds a lot of movement to a page....and it gave an additional punch for Madame Butterfly.
This is my last page and you can see that I used the same paper for the inside back cover with hinge as the same for the front cover.
This is the view of the book opened. The photo I took of the spine do not show the tops of the chopsticks...but they have little brass caps.
I followed the directions for a piano hinge book in Books with Girth by Cherryl Moote. She has published great books on bookbinding techniques with awesome photos and easy to understand directions. My friend Judi loves her book!
Labels:
Art Book,
art projects,
Asian,
bookbinding,
Cherryl Moote,
Piano Hinge Book,
rubber stamps
Field Journal 3x3 Book
The 3x3 books are so much fun to create. I decided to make one with a bird theme. The clear tags I used are Tim Holtz. There are so many sizes and shapes to choose from! I adhered neat bird prints and used sheet music as the backing. The tassel I made is messy like the bird nests themselves.
This sweet little bird is German scrap and carries the message of "fly". I used an antique button as an embellishment with a the letter "B" glued on top.
The cardboard letter I chose was "H", not only for "home" but also for my last name. I used rubberstamps from Character Constructions to spell out the word home.
The silhouette rubberstamp was used on an old shorthand text paper. I enjoy using vintage papers in this manner.
The completed page was not what I envisioned but I learned a lot in the process. I stamped on a transparency, then used Twinkling H2O's for coloring. I sprayed a fix adhesive and applied to the Josh paper. Then I felt the bird needed "grounding" so I restamped and glued the leg portions on top of the transparency. This was just the beginning of what I needed to do to balance this page. Whew....I was happy when I was able to move on......I spent so much time on it that I could not give myself permission to scrap it and start over!
The small feather rubberstamp is from Character Constructions and the bird is a reprint.
Joys are our wings! Isn't that the truth! The bird came from ArtChix Studio and I used a punch for the crown. The black rhinestones are from Bead Ranch in Stillwater, Oklahoma. The Colorado Springs bus token is my special embellishment.
I love these new designs from Character Constructions - "The Bird & Bee Paperie". This is grandmother bird. The background paper had a perfect oval to use and it was off-center...and that became a design element. The little bird house was swiped with gesso to give it more dimension.
More new stamps from Character Constructions. I stamped the bird separately, cut it out and did the same with the bird bath. The quote is also Character Construction but I stamped it to fit the page area.
The butterfly ribbon was purchased from Stamp Asylum. They have so many very cool trims!
I bought green and chocolate dingle ball trim from a scrap booking store in Dallas.....trims were on sale at a 50% discount. Who could resist!
The cute little bird is from a collage sheet sold at ArtChix Studio. I love the gold crown and added a bit of blue trim....Ah, create joy!
I also used stickers. I trimmed with the brown stripe ribbon to complete this page.
The quote is from Catherine Moore's Character Construction line and the bird is from an ArtChix Studio collage sheet.
Diamond Glaze was used to give dimension to the eggs in the nest. Diamond Glaze is a very cool product!
I have to tell you that I have a great collection of feathers of all colors. My daughter buys "feather toys" for her cat and when the toy is destroyed from active playing.....I get the feathers!
Don't you love these stickers from Cavallini?!
Again I used a clear tile from the Tim Holtz collection on top of the "Inches".
This was another one of those pages that was a bit of a struggle. When the vellum didn't work out, I placed a sticker on top. When I used a product at the top corner that also didn't work out...I added the tiny beads to cover. I could have thrown it out but when I thought it is already past saving, it freed to me try something else. In the end it was okay.
I especially like using the egg rubberstamp. The bird silhouette is adorable.
The bird cage was stamped onto tissue paper and an olive green felt ribbon was added for the embellishment. I wanted to find a bird print that I could reduce for the cage...but I didn't really have anything suitable.
This print/text was sent to me by my art friend in England. I saved the originals and made copies for my artwork. I have several and they are the perfect size.
Ah, the final page...the back cover where I used a rub-on. I hope you enjoyed this....I already have two more themes that I can hardly wait to make!
Labels:
3x3's,
Art,
Art Book,
rubber stamps
Happy Valentine!
This is the first of the four ATC Valentine's that I traded with my friends. This one has vellum added as I thought it gave the kiss a feeling of being special. Cupid is a rubber stamp from B-Line Designs. The dimensional red German scrap is from ArtChix Studio.
I really like dividing the background on this ATC which showcased the couple as separate players. I added the rose German scrap at the bottom as an embellishment for the two lovers.
The images I used were purchased from ArtChix Studio. They really have a great selection. The ribbon at the bottom is velvet. I thought it would enrich the mood of the card. The heart at the top was from a package of assorted heart sizes from Michael's.
For this ATC, I added a transparency as the last layer....but it did not photograph well because of the glare. The German scrap was my final embellishment.
Labels:
art friends,
ATC's,
rubber stamp stores,
rubber stamps
Subscribe to:
Posts (Atom)