Showing posts with label altered jewelry. Show all posts

Bling!

Inspired by the wonderful charms that my round-robin group made for my necklace caused me to dig for the buried charms from a group project that was published in the Belle Armoire addition a few years ago. I thought I would use the charms but I never got around to adding them for a bracelet or necklace. Ever do that....think about doing something and then forgetting about it later. Years pass by?... So I found the abandoned charms from the past and added them to the necklace. Now I can enjoy and be inspired by all the very clever and talented artists who made them.

This particular charm is my absolute favorite one! I wish I knew who the artist was! If you see this and it's you, please let me know and I will rewrite this post and give you the credit you deserve. Perhaps you can tell me how it is made. Love it, love it.


East Meets West

I've really enjoyed participating in the jewelry round robin. Judi requested smaller size charms with a vintage look. I already knew that she enjoys Asian themed artwork and embellishments. I had an antique Tulsa bus token in my stash that I thought would work perfectly for her necklace. The challenge for me was to keep it small and simple!

I also enjoy Asian themes and have accumulated a collection of ephemera and embellishments. I found a charm that I wanted to use as my base. I attached a jump ring after I drilled a center hole in the charm.  The photo below shows Judi's necklace without the charms added as she will do this herself.

Everyone before me made a tag explaining their artwork so I decided I would do the same and named my piece "East Meets West".

Portal

I'll explain why I named Susan's charm for her round robin necklace "Portal". Diamond Glaze was added on top of the image and left to dry overnight. The next morning,it appeared to me as if the image was coming through a "mirror"...so hence the naming "Portal".  I apologize for the glare!
I used a watch back for the photo and attached it to a Tim Holtz gear using E-6000.
A very tiny butterfly embellishment was added before the Diamond Glaze dried. 

Art for Sharon

I sure hope Sharon loves the charm I made for her as I really, really, really didn't want to give it up after I made it....ever have those moments?!
The blank little tin was the perfect size I think for Sharon's round robin necklace.  Of course, she loved visiting Versailles and Paris last year.  I thought perhaps this would be a reminder of her great trip!
I used a "frame"embellishment for Marie's photo and then applied Diamond Glaze on top.
I debated with myself for a long time about which way I wanted my "locket" to open.  Since it does take effort to open it, I thought the top would not slide off and be lost. I wanted Sharon to be able to share with a possible admirer of the contents without the inside content being upside down.  On the flip side, Sharon will be the one to view it upside down if she opens it while wearing it. Hopefully, my end decision was a good one!
I did find an Eiffel Tower charm in my stash and with handy wire clippers I removed the charm's loop which allowed me to glue the charm flat against the paper using E-6000.  The little red hanger was attached to the bottom tin using my husband's tool for seting grommets.  This was my first time using this tool and it was hard for me because of the weight and size of the tool.  Definitely not made for smaller hands!  He did insist that I keep this tool for my art room, however, I will be asking him to set the grommets in my next project!

Butterfly for Barb

Another butterfly for Barb!
I hope Barb doesn't grow tired of receiving butterfly artwork......as I enjoy the butterfly theme so very much. This is a hard plastic material that I purchased from a stamp store already cut into the butterfly shape. Using a heat tool allows you to manipulate the shape of the butterfly. After coloring the one side with alcohol inks, I then collaged a dictionary page with the word butterfly.
I added a very lightweight mulberry paper to the backside of the butterfly and then misted it with a light wash of yellow which added to the transparency of the paper. You can see some of the dictionary paper behind it....love that!

Charm for Jan B.

When I received Jan B's necklace, there were so many ideas swirling around in my head for a charm that I could make. I found wooden letter tiles that I had purchased a long ago that were made to be as place-cards for dinner parties. The letters have been used in a variety of art projects, including this one! I don't think I have enough letters now to spell anyone's name but what's remaining in my collection is perfect when you only need one letter!
First, I colored the white tile with a soft ochre color and then stamped a flourish design in black archival ink. Burnt brown was applied as a border. A dimensional bubble tile on top of the "J" was added after everything was heat set.
The other artists added charms that were a bird theme, so I played along. After I adhered the image, I applied a gel medium on top for sealing. When this was dry, I added Rock Candy crackle paint by Ranger. A small smidgen ochre was applied on top.

After drilling the hole, my favorite part about the charm is the embossing powder that I used on the edge. I tried thinking about copper tape, maybe coloring the edges with gold leaf pen but that just seem didn't exciting to me....then the idea came to use embossing powder that I have owned for eons. And that was a good thing! I love the result!

Charming

I've decided not to wait until the end of the year to post what I've made for the other artists but instead post more frequently throughout the year. The art group I am part of are doing a round robin necklace where each participant is making a charm for each artist's necklace. This idea was inspired by an amazing artist that I met in Paris with Catherine Moore's art group. She goes by the name "Z" and her necklace inspired all of us! So thanks Z!
I decided to use my antique white button collection to make a chain for my necklace.  I added a silver jump ring to each buttonhole to connect to the next button.  For a few buttons that had four holes instead of two, I added an extra jump ring so one could add additional charms.  I made two charms for my necklace before sending it on to the first round robin player.  I stamped my image onto shrink plastic and then coated it with clear UTEE.  I embedded a tiny fleur de lis and then applied another coat of UTEE.
I used a Tim Holtz glass vial to hold an antique calligraphy nib.  I wrapped the glass vial with small strips of Washi paper and then sealed using Claudine Hellmuth's gel medium.  I melted beeswax and painted around the cork.  I use a designated paint brush for my beeswax applications.
This view shows my necklace with only my charm.  After the round robin, I will attach the other artists charms for the best balance taking in consideration the weight and size.  I can hardly wait....
The above charm is for Jan's necklace and it is an antique poker chip.  I added a Paris theme and sealed it with Diamond Glaze.  A few sprinkles of micro beads were added to the top.
 This is the back of the chip which I colored with brown ink and then heat sealed.  I applied gesso to the charm and then wiped some of it away to create a worn look.  Of course I had to add a French message for Jan which is embossed in gold ink.
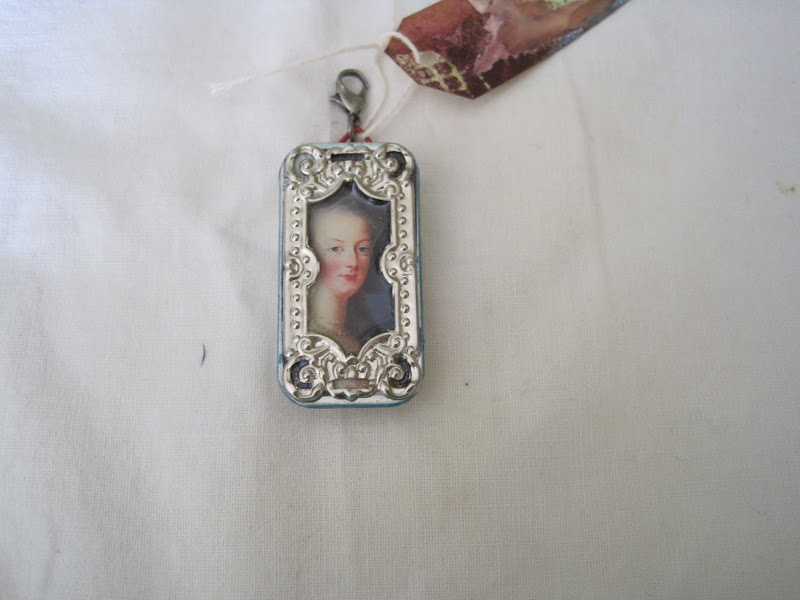
 Marsha's necklace was my first package received in the round robin group.  I used an antique crystal from a dismantled light fixture for my image.  I used Glossy Accents to adhere the image to the crystal using all the Tim Holtz tips.  The image came from ARTchix Studio.
This is a terrible camera photo!!! I didn't realize the details do not show until the necklace was sent off to the next artist.  The backing is a paper towel that had so many layers of blues and purples inks...really.....I think is rather stunning.  The Viva paper towel was used to clean my craft sheet of extra inks from previous projects.  The colors looked so wonderful when dried and the texture of Viva looks like linen when the ink dries on it.  The remaining napkin was used in Marsha's birthday project.  Yummmm....I should figure out why I can't throw anything out!

The final thing was sealing the paper towel with Claudine Hellmuth's gel medium so that the colors wouldn't bleed onto clothing or skin.